What Are Tears In Leather?
This guide will show you how to fix a tear in leather. The same procedure applies to tears in all type of leather; furniture, car interior, clothes and all other leathers.
Products needed to carry out a repair to a tear or to a hole:
- Fabric sub patch or leather sub patch
- Scissors
- Pin
- Leather Glue
- Low Tack Clear Tape
- Glue Stick
- Spatula
You can get all of these products in a handy leather glue repair kit.
The very first item you need in any repair you’re going to carry out to a tear / rip / hole or fag burn is the backing fabric. This can either be poly cotton or leather, but the leather must be very thin fine nappa leather.
If the tear or split has a very rough edge to it with fibres sticking out, it’s advised that these are trimmed off to give a cleaner repair line. This can be done using a good sharp pair of scissors. Do not cut into the leather, just trim the fibres that are sticking out.
Once you have cleaned up the tear, you can then start to feed your sub patch behind the leather.
Here are some pictures with captions of what they refer to.
This is a typical tear in leather, this one happens to be in a leather jacket. Same principals apply to carrying out the repair, no matter if it’s on car seats, furniture, handbags and other leather goods.

Typical Tear In Leather
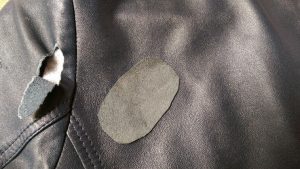
Here we have the sub patch, cut to shape with rounded ends. The reason for this is so that when you’re working in tight areas & the sub patch is put in place, it does not get curled up as it would do if you had cut this in a standard oblong with pointed corners.

Tear Sub Patch Cut To Shape
This is the tear with the sub patch cut ready to be placed in fully behind the tear.
We have used leather in this picture. Make sure the rough side of the skin is facing the rough side of the item being repaired. This way you form a better stronger bond.

Sub Patch Being Put Behind The Tear
The sub patch is now in place and being held with a pin to stop it from moving around while you glue one side of the tear to secure the sub patch in place. Once one side is glued the pin can be removed.

Sub Patch Fully In Place
Once the sub patch is in place fully you can then apply the leather glue to one side of the tear. Apply this to the leather and not the sub patch, then very gently pull the side of the tear that is glued over and push down to secure in place to the sub patch.
Then repeat the same process for the other side. This time also add a small amount of leather glue to the join line itself before securing in place fully, this way the glue can act as a filler and can be lightly sanded if required and coloured over.
At this stage get your clear tape ready. This is for when you have applied the leather glue to the other side and you can use the tape to pull the two halves together, creating a perfect hair line repair, that will almost be invisible.
To see how a repair is carried out in action take a look at this video link;
If the repair happens to be to a hole, you can cut some leather to the same shape as the hole and thin down the outside edges on the underside. Once you sub patch is in place, glue it in position, making sure that the grain pattern is very similar before applying.
This will then leave a fine line around the edge of the patch. Once the patch is fully dry and the glue is fully set, you can fill with either flexi filler or heavy filler. Once all the filler is dry this can then be sanded back. DO NOT OVER APPLY THE FILLERS. When sanded back you can colour the leather as normal to blend in and make a perfect repair.